
![]()
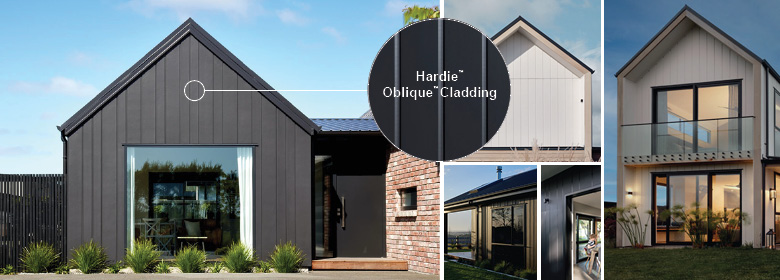
Elevate your builds and create flawless street appeal for years to come with the bold, new vertical cladding solution from James Hardie, Hardie™ Oblique™ Cladding. With a similar appearance to metal cladding, Hardie™ Oblique™ Cladding is an easy-to-install alternative made from premium fibre cement. No need for specialist installers, Oblique™ reduces the number of trades on site, saving you time and money.
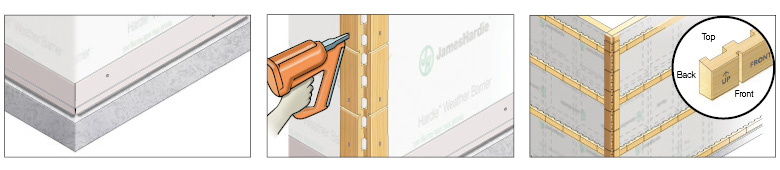
Hardie™ Oblique™ Cladding is designed to emulate the look of metal cladding
With vertical cladding in hot demand from homeowners, the new Hardie™ Oblique™ Cladding is sure to be a favourite. Delivering a bold, modern look through its wide grooves and angled edges, Oblique™ Cladding is the only Hardie™ exterior cladding product with a slanted groove edge that mixes shadows and highlights to provide interest and depth.
Hardie™ Oblique™ Cladding is available in 200mm and 300mm wide shiplap boards, which can be alternated for a unique design or installed consistently for a traditional look. Similar in appearance to metal cladding, it’s a durable and easy to install premium fibre cement alternative.
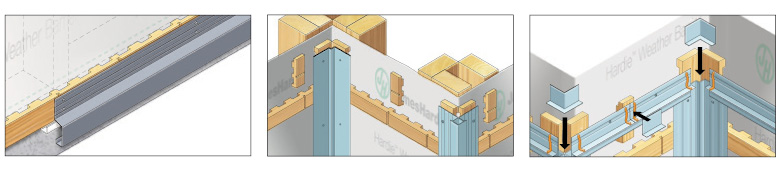
To make things even easier, the horizontal Hardie™ Castellated Battens allow ventilation and drainage through the cavity. The 2750mm boards suit common wall heights to help to reduce waste, while the 4200mm lengths give tall walls a continuous look, reducing the need for horizontal joints. The boards are pre-primed and ready to paint.
Hardie™ Oblique™ Cladding is made with Hardie™ premium fibre cement to keep it looking good. It’s also resistant to damage from termites, rot and moisture, and engineered to stand up to coastal and other harsh conditions.
A new, shiplap system
Hardie™ Oblique™ Cladding is a new premium fibre cement cladding system from James Hardie. Unlike other cladding options from their range, Oblique™ is supplied as individual shiplap boards, installed on a castellated batten.
Dahlsens has partnered with James Hardie to bring installation training to your team. Register your interest for upcoming events, cladding clinics and onsite training below.
Vertical installation made possible by the NEW Hardie™ Castellated Battens

✔ Mix + Match panel widths for custom designs
✔ Moisture management allowing ventilation and drainage through cavity
✔ Suitable for both Hardie™ Oblique™ Cladding and Stria™ Cladding
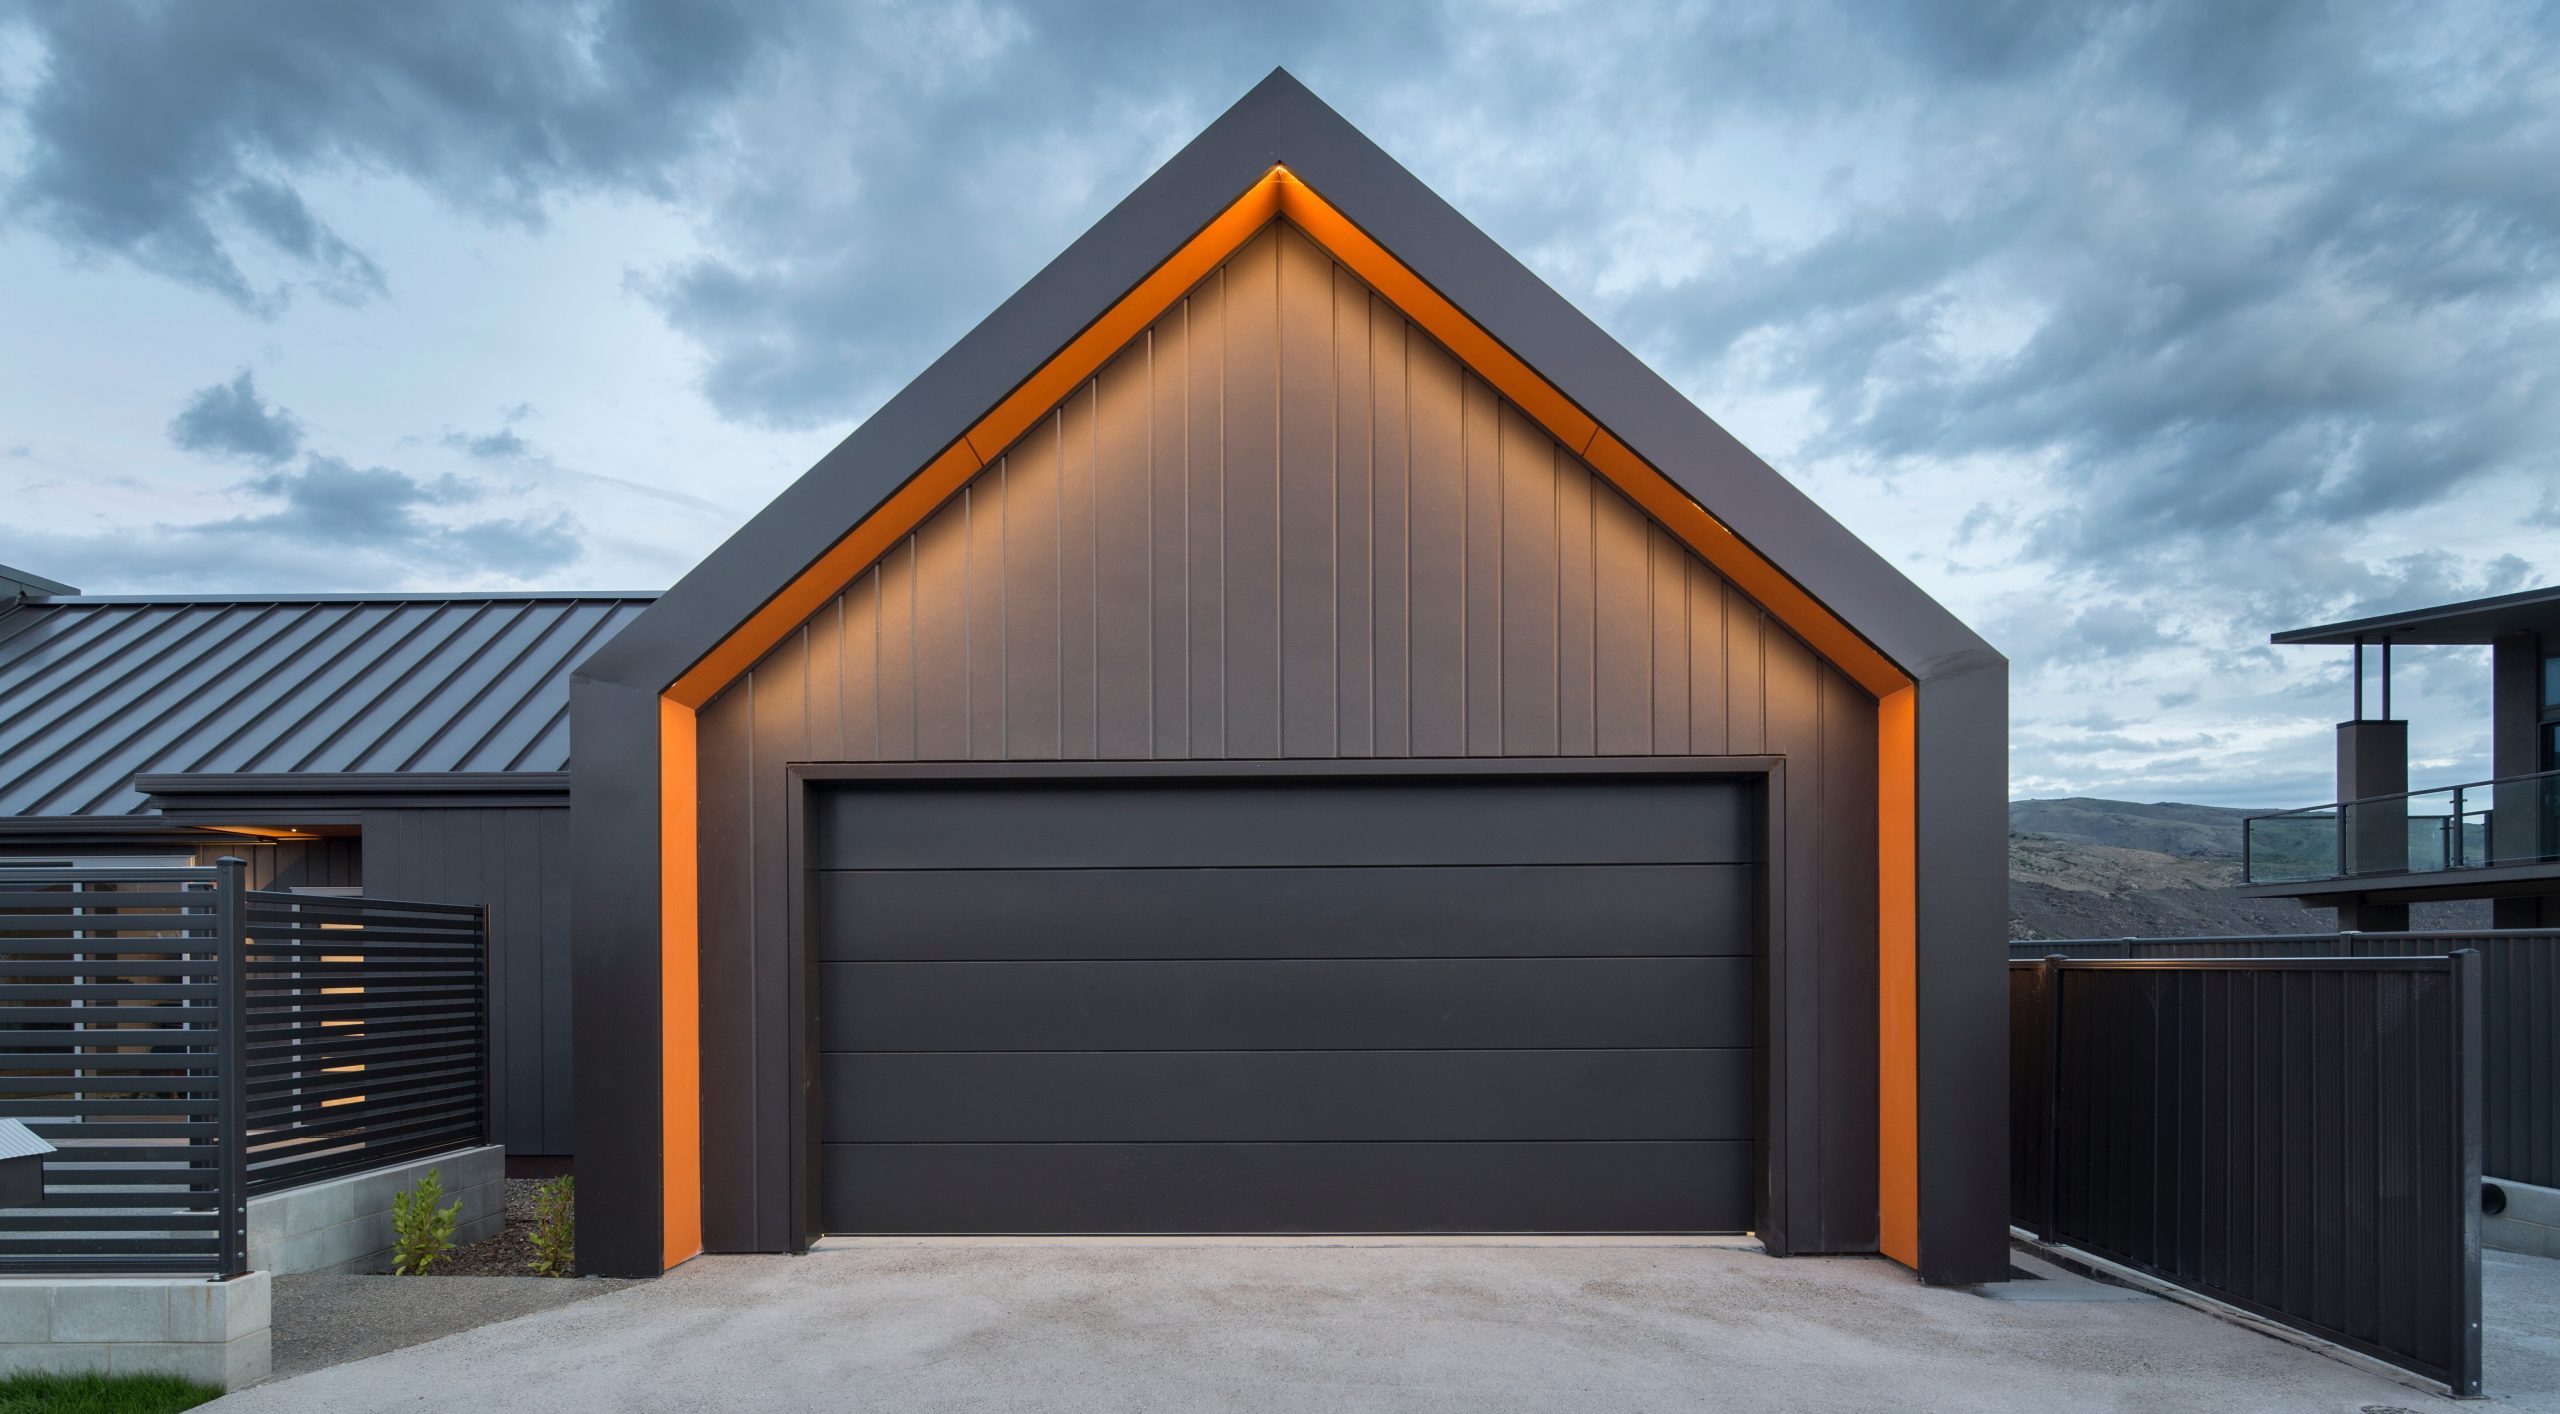
Check out this farmhouse clad in Hardie™ Oblique™ Cladding
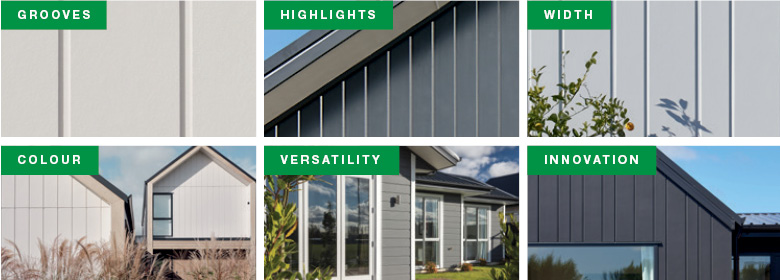
Features of Hardie™ Oblique™ Cladding
- Grooves: 23mm wide and 6mm deep, with the option to place the oblique edge to the left or right
- Highlights: When oriented northwards the slanted edge creates depth and elevation
- Width: 200mm or 300mm wide, with 175mm or 275mm groove spacing
- Colour: Supplied primed for the paint colour of your choice
- Versatility: Install vertically or horizontally, re-clad existing homes or use from the ground up for a new build or extension
- Our innovative castellated batten method makes vertical installation and bespoke arrangements easy
Reasons to choose Hardie™ Oblique™ Cladding
- Easy to install: no need for specialist trades reducing complexity and trades on site
- Easy to paint: comes pre-primed and ready to paint
- Cost effective: horizontal castellated battens simplify vertical installation
- Fire resistant: can be used as part of Hardie™ Smart Fire and Acoustic Wall System with a fire resistance level (FRL) of up to 60 minutes
- 25-year product warranty
- CodeMark certified
Step by step guide for installing Hardie™ Oblique™ Cladding
Installing Hardie™ Oblique™ Cladding is simple, straightforward and can be done in just four steps. With the help of Hardie’s extensive range of cladding products, customers can rest assured they are getting stylish, durable cladding that’s built to last.
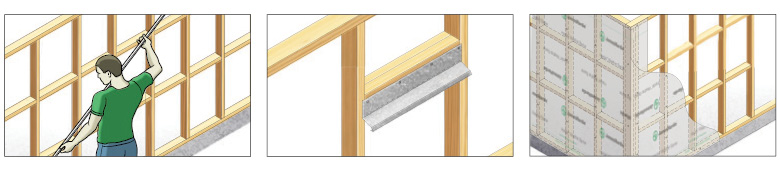
Step 1: install the frame, corrosion-resistant flashings and Hardie™ Weather Barrier
Start by installing your frame, ensuring you have a maximum noggin space of 900mm. All noggins must be aligned to provide continuous support to the Hardie™ Castellated Batten. Install the required corrosion-resistant flashings over windows and other openings before installing Hardie™ Weather Barrier.
Step 2: fix the Hardie™ PVC Vent Strips before installing the Hardie™ Castellated Battens
Next, install the Hardie™ PVC Vent Strip along the bottom plate. Install Hardie™ Castellated Battens in a vertical orientation on each side of internal and external corners before installing the Hardie™ Castellated Battens over each noggin and top/bottom plated at max. 900mm centres.
Step 3: install the Hardie™ Trimline Flashing and Hardie™ Trimline Flashing jointers
The third step is installing the Hardie™ Edge Trim (optional). Install the internal and external corner accessories and the Hardie™ Trimline Flashing followed by Hardie™ Trimline Flashing jointers.
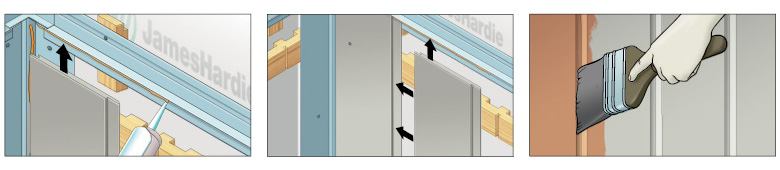
Step 4: apply Hardie™ Joint Sealant and fix Hardie™ Oblique™ Cladding to the frame
Finally, apply a continuous bead of Hardie™ Joint Sealant to the underside of the Hardie™ Trimline Flashing and along the corner accessories. Push the first board against the flange and fix to the
frame. Repeat the process for the remaining boards. Paint within three months of installation, or within seven days if located in a coastal area or corrosive environment.
Find more James Hardie cladding products at Dahlsens
Dahlsens supplies a full range of cladding products from James Hardie™. Head to your local store or speak to your account manager to learn more about how these Hardie™ products can help transform your customers’ homes.
- Linea™ Weatherboard
- Axon™ Cladding
- Matrix™ Cladding
- Stria™ Cladding
- Hardie™ Fine Texture Cladding
- Hardie™ Oblique™ Cladding
- HardieFlex™
- EasyLap™
- PrimeLine™
- HardiePlank™
Dahlsens. The ultimate cladding solution.
Weatherboard, timber, metal, render, geometric, textured – no matter what style you’re trying to achieve – Dahlsens has a solution. Our knowledgeable team can help you compare different materials, styles and technical specifications to bring your project to life.
Our trade stores can organise suppliers to provide onsite advice and installation training for you and your crew and the ‘Ultimate Cladding Guide’ provides a quick reference table to compare products.
So, you’ll have the confidence to recommend new solutions, take on more projects and give your clients the answers they need
DOWNLOAD THE OBLIQUE™ BROCHURE
DOWNLOAD THE OBLIQUE™ INSTALLATION GUIDE
If you’d like to know more about this innovative new cladding solution, request installation training or to receive a quote, speak with your account manager or visit your local Dahlsens store.